VodaPay Auth Code
my.getAuthCode API
This API can be used to get the authentication code when signing in a user on a Mini Program. When the Merchant's front-end calls this API, VodaPay will present the user with a popup asking for permision to share their details. If the user clicks "Allow & continue" on the popup, the authentication code will be sent back to the Merchant front-end and this can be used to get the user's details. If the user denies, the ideal expectation is for the merchant to call the API again.
An Example of a popup that will be presented to a user:
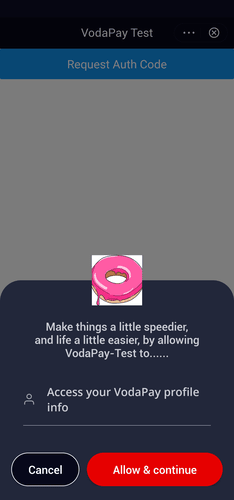
Do not display an error message or an error page when a user clicks on "Cancel".
However, you can have a popup letting the user know that, to give them the best experience you will need to access their personal details. We do advise to give the user an opportunity to experience your mini app before trying to authenticate them.
AuthCode: This is a one-time use AuthCode passed from VodaPay to the Merchant's Mini App front-end via API. The AuthCode is only valid for a short time and it is for a single use only. The code is required to fetch the VodaPay access token via the VodaPay /v2/authorizations/applyToken backend call.
AuthCode Sample Code
- Request
- Response
//Please note that the following API is used on the mini program fron-end
getAuthCode() {
    my.getAuthCode({
      // If you have more than one scope you can pass them as an array. One scope can also be passed as an array.
      // e.g scopes: ['auth_user','NOTIFICATION_INBOX']
        scopes: 'auth_user',
        success: (res) => {
            // Do something with the auth code.
            my.alert({
                content: res.authCode
            });
        },
        fail: (err) => {
            my.alert({
                content: err
            });
        }
    });
};
{
  "authCode": "0000000001NS2JbUdNT076MO00327491",
  "authSuccessScopes": ["auth_user"]
}
Request Attributes
scopes<String/Array | optional>: There are different types of scopes check the authentication scopes section, by default, its value is auth_base.
Success Callback Function
The incoming parameter is of the Object type with the following attributes:
authCode<String | Mandatory>: Auth code.authErrorScopes<Key-value | Mandatory>: The scope that failed to grant auth, key is the scope and value is the error.authSuccessScopes<Array | Mandatory>: The scope that succeed to grant auth.
When testing with a Sandbox Merchant and Client IDs, my.getAuthCode() API can only be used with a device and not with a simulator.
Using it with a debug or preview QR code might throw some errors, when testing with Sandbox Merchant and Client IDs. However, you can use a debug and preview QR code once your mini app is configured with production Merchant and Client IDs to test my.getAuthCode().
/v2/authorizations/applyAuthCode
This API is used to generate an Auth Code on the test environment (Sandbox) without the need for the mini app front end. The Auth Code generated from this API can be used the same way as the Auth Code generated from the my.getAuthCode() API.
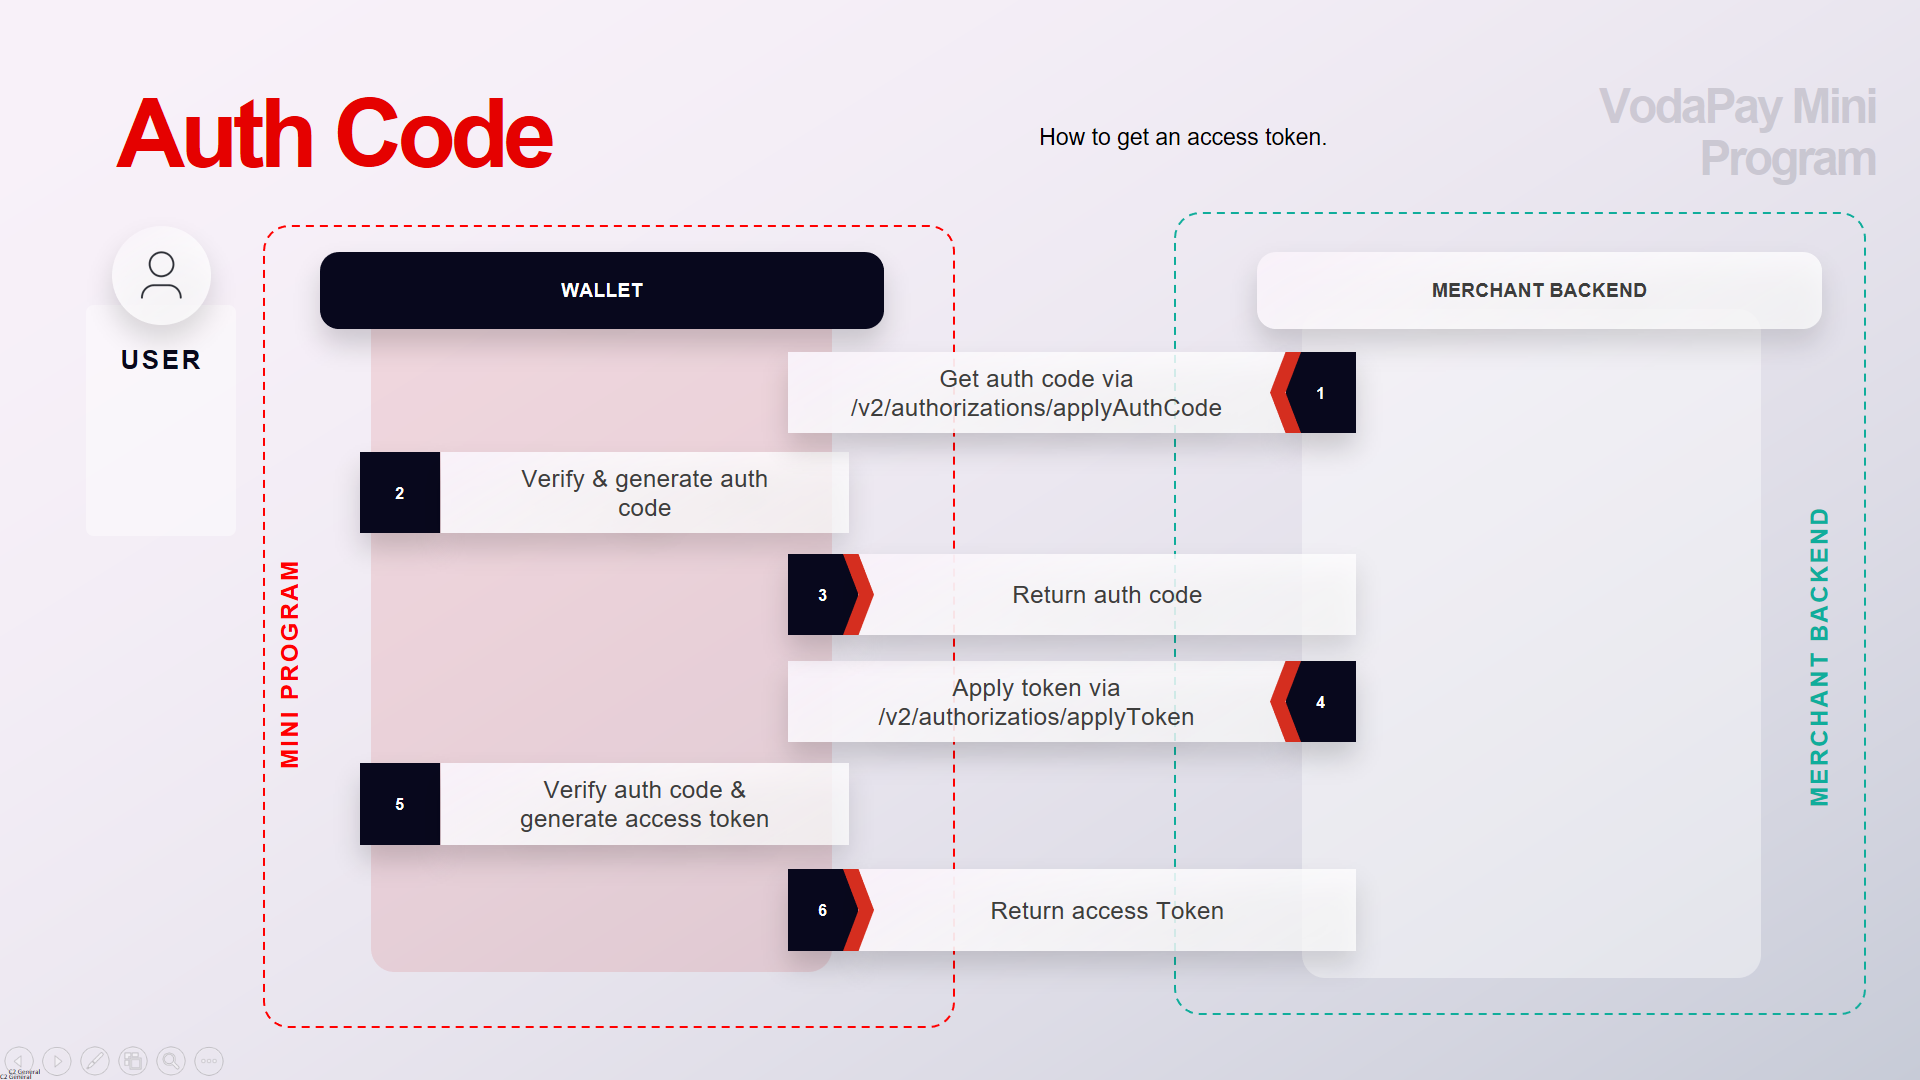
VodaPay Apply Auth Code Process
The authorization code is used to exchange for an access token.
![]()
- The merchant server calls applyAuthCode API to get auth code. (Step 1)
- The merchant server calls the applyToken interface to apply for the access token from the e-wallet server and the e-wallet server returns the access token and customer ID to the merchant server. The access token should be kept in the merchant server only, which means that it should not be returned to the Mini Program. (Step 4 and Step 6).
This API cannot be used in the production environmet to generate an Auth Code it is only for the development environment.
Please use my.getAuthCode() API to generate an auth code in production.
Apply Auth Code Sample Code
POST
/v2/authorizations/applyAuthCode
- Request
- Response
{
        "Content-Type": "application/json",
        "Client-Id": "2021072719************",
        "request-time": "2021-02-22T17:49:26.913+08:00",
        "Signature":"algorithm=RSA256, keyVersion=1, signature=testing_signatur"
}
{
    "clientId":"2021072719************",
    "userId": "216610000000662735***",
    "scopes":"auth_user"
}
{
    "result": {
        "resultStatus": "S",
        "resultCode": "SUCCESS",
        "resultMsg": "success"
    },
    "authCode": "0000000001KtXSdhlokr58QV00118302",
    "merchantId": "2166200000001880*****"
}
{
    "result": {
        "resultStatus": "F",
        "resultCode": "PARAM_ILLEGAL",
        "resultMsg": "AE11112060005900@UNKNOW_ERROR"
    }
}
Request Attributes
authClientId<String(32) | Mandatory>: Merchant's Client ID.userId<String(32) | Mandatory>: It identify the user in the e-wallet side. You can use the fix value '216610000000259832353' when you test this. This user has already registered.scopes<String(32) | Mandatory>: It defines which functions you need, to be authorized. Check the authentication scopes section.
Response Attributes
result<Result | Mandatory>: The request result, which contains information related to the request result, such as status and error codes.authCode<String(128) | Mandatory>: This can be used to apply for an access token. The default expiry time is 10 minutes.merchantId<String/Datetime | Mandatory>: This is used to identify the Merchant in the e-wallet side.
Result process logic
For different request results, different actions are to be performed. See the following list for details:
- If the value of result.resultStatus is S, the authorization token application request is successful. The merchant can use the access token to access the corresponding user resource scope.
- If the value of result.resultStatus is F or U, AuthClient may guide user to try again.
Result Statuses
SSUCCESS: Success.FPARAM_ILLEGAL: Illegal parameters exist. For example, a non-numeric input, or an invalid date.
Authentication scopes
USER_ID: Authorized to obtain the unique user ID.NOTIFICATION_INBOX: Authorized to send notification to user's notification in app inbox.NOTIFICATION_PUSH: Authorized to send push notification to a user.auth_base: Authorized to obtain the unique user ID.auth_user: Authorized to obtain user information.
USER_ID and auth_base are used to silently obtain user ID. Silent authorization means, the user will not be presented with an auth popup. All the other scopes are used for proactive user authorization.